

🧱 LEGO Lore 🏗
LEGO Manufacturing + Kreysler (K&A) Composites

🤯 Fast Facts - LEGO Edition!
Due to the precision of brick molding machines, only 18 elements in every million produced fail to meet the company's high standards.
Approximately 19 billion LEGO elements are produced per year. That’s 2.16 million molded every hour, or 36,000 every minute.
More than 400 billion LEGO bricks have been produced since 1958. There are about 62 LEGO bricks per person in the Earth's population.
👶 Meme Of The Week

📰 Hardware News
The Exploration Co., a European space startup, has raised €40 million ($43.9 million) in Series A funding. The company is developing the Nyx, a reusable space capsule that can be used to transport cargo, resupply space stations, and eventually transport people.
Zeitview, formerly known as DroneBase, has raised $55m to expand its air and ground data-capture technology. Zeitview uses drones to capture data such as images and thermal readings on infrastructure like wind turbines and solar panels, and runs the data through AI algorithms to alert customers of any anomalies.
London-based Recycleye recently raised $17 million in funding for its recycling-picking robots. The technology cuts the cost of sorting materials and helps to address the plastic pollution crisis, a major contributor to climate change.
Kreysler & Associates: Composites 🤝 Art / Architecture
This week we’re highlighting a company that is all about learning by doing. Kreysler & Associates is an extraordinarily hands-on company obsessed with pushing the edge of custom composites and fiberglass fabrication capabilities.
It’s no secret that architects and engineers can often be at odds with each other given that their missions are relatively conflicting. As such, composites, which are among the highest specific strength materials (strength per unit mass), have gained traction in the space over the last 20 years by enabling new form factors previously thought impossible.
Kreysler & Associates was founded by Bill Kreysler when he decided to bring the high-performance fiber-reinforced polymers present in the boating industry to the art/architecture industries. That, along with heavy leveraging of large-scale CNC and digital manufacturing methods enables them to create some pretty crazy projects (a few are shown below)
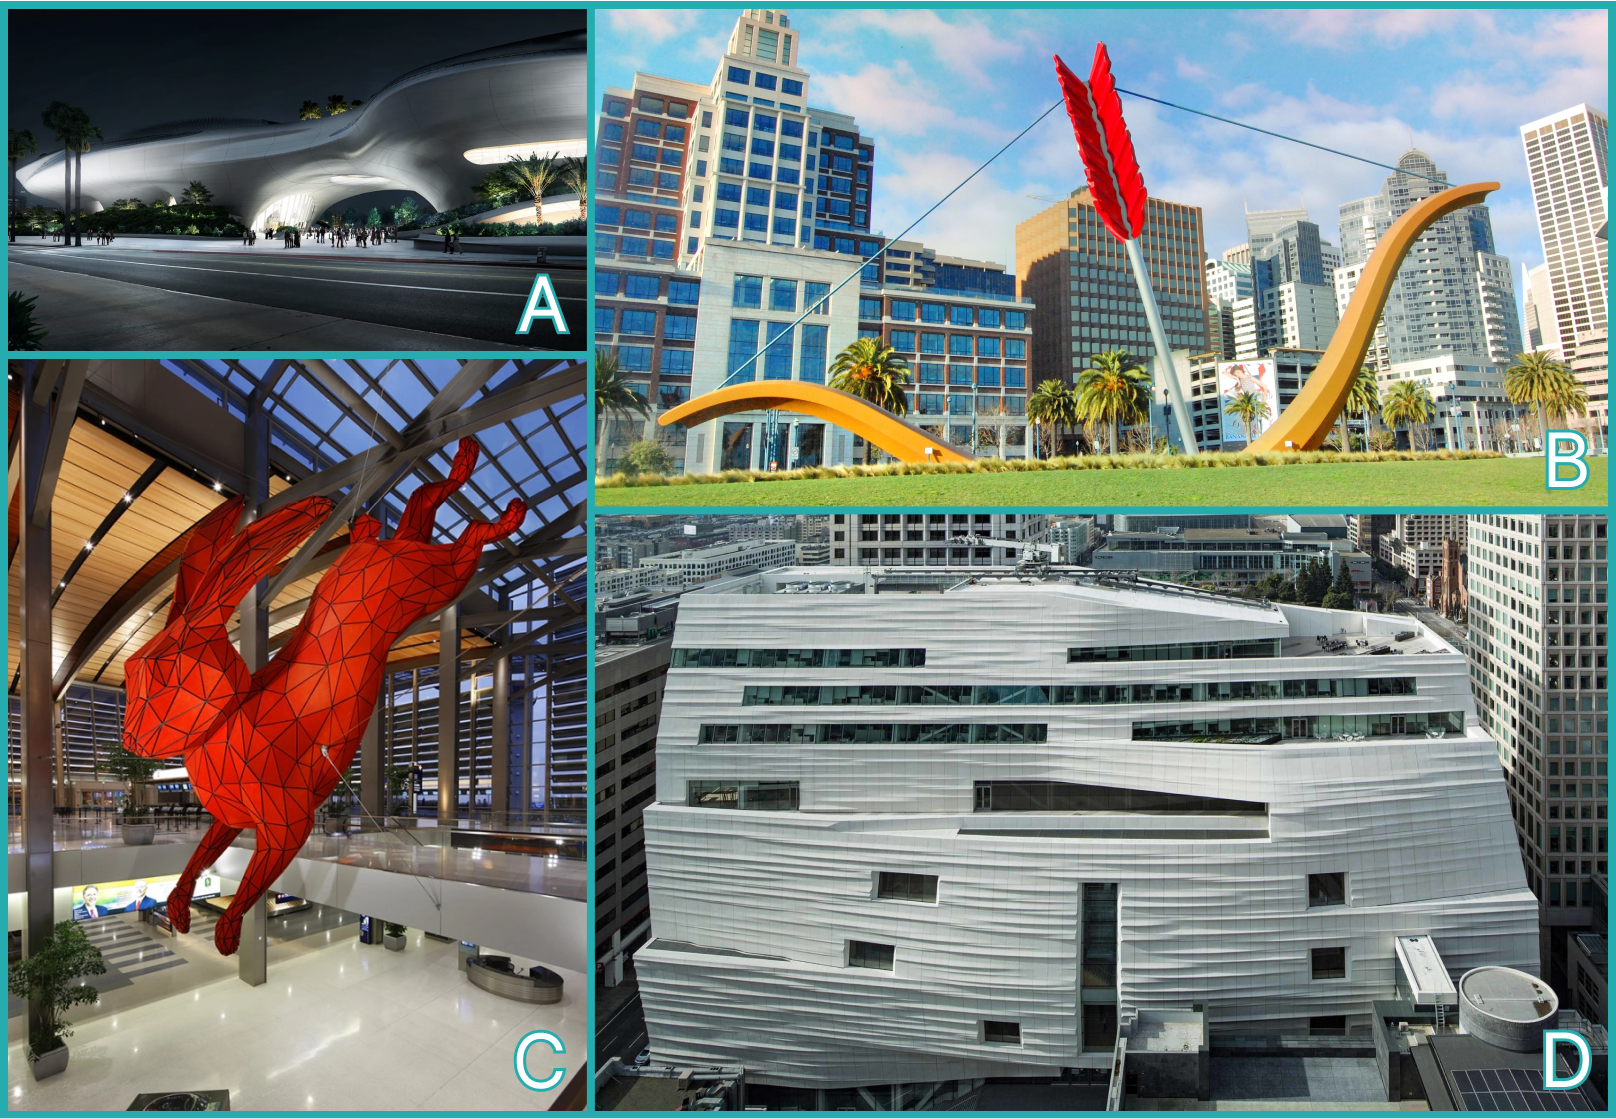
“Facades” are another common feature of modern architectural landmarks, wherein the interior can be built more traditionally, while a lightweight facade guilds the exterior, allowing the artist to create a more organic or sculpted surface than might otherwise be achievable.
A: Upcoming Lucas Museum (LA), B: Cupid’s Span (SF), C: Leap (Sacramento), D: MOMA Facade (SF).
Though not a traditional “tech” opportunity as we tend to feature in our newsletters, this company has been growing very rapidly over the last year and given its emphasis on hands-on learning, it’s a good opportunity for someone interested in art/architecture, construction, custom composites, fabrication or some combination of the four. They are actively hiring for full-time and internship roles in Vallejo CA (north bay), apply below! Links below go directly to the recruiter, so your application is guaranteed to be viewed.
Internships (multiple positions available depending on interests):
Digital Design and Fabrication - Mechanical (Summer 2023)
Mechatronics Programming - Summer 2023
Full-Time:
Manufacturing Tooling Engineer
Mechatronic Programming
CNC Programmer
🙋♂️ Interview Practice Question of the Week
*Company: Apple

Pictured above is a poorly designed 2x4 LEGO brick. Improve its design with manufacturability (injection molding) in mind.

“A brown bear playing with large legos, digital art.” Graphic is generated using OpenAI’s Dalle2.
✅ The Answer
We could give you the ~quick and dirty answer to this one, but we think it’s an awesome opportunity to dive into injection molding and a little LEGO history (or lore, if you will).
Injection molding is an important concept/skill that is rarely discussed in school, but used frequently in MechE jobs, especially in product design. This manufacturing method is so prevalent primarily due to its ability to produce high-precision parts, in large quantities. For lower quantities, 3D-printed or machined plastic (depending on how representative the material properties need to be) can make more sense as creating a mold can be expensive, and only pays off if that cost can be amortized across thousands of parts.
As a design engineer, technically, you are mainly responsible for designing the part (manufacturing/process/tooling engineers are more involved). That being said, there are some fundamentals that you need to know. The mold consists of two large blocks of metal: the core, and the cavity. These are usually CNC’ed out of aluminum or steel and can then be hardened via heat treatment after machining. If hardened, modification to a part after the tooling is made can be extra expensive because the material being re-machined is now hardened steel (it’s still cheaper than getting a new mold. This category of alterations is referred to as “tool-safe” changes, and tolerances should be designed accordingly as more material can always be taken off, but adding is difficult). The plastic that is getting molded starts off in pellet form and is then heated and pushed through a large heated screw via a hydraulic piston. High pressure is essential to make sure the plastic fills the entire mold. Once the mold is filled, the plastic is cooled and then ejected from the mold often with pins or high-pressure air.
Now that you’re familiar with the basics, back to LEGOs!
LEGOs are considered to be some of the best-designed injection-molded projects in the world. The average maximum force the bricks can stand is 4,240N (950 lbs). If you divide that by the mass of a single brick (1.152g), then (without accounting for buckling), you could stack 375,000 bricks high before yielding occurs. Also of note, a fan tested how many times a LEGO brick could be assembled before failing. The answer: 37,112 times!
So now we know, that you know, that LEGO design is sick! We hope you’re as excited as we are. Let's dive into the details!
The wall thickness of a LEGO brick is 1.2mm and is uniform throughout the part (depending on the model/release date). This is essential so that plastic flows uniformly through the part, and upon cooling, shrinks at the same rate. Parts are filleted where appropriate (outer radius = inner radius + material thickness) to maintain even wall thickness throughout. This reduces stress concentrations, improves flow, and makes ejection easier.
All walls of the part in the tooling direction are drafted by 0.5 degrees so that it can separate after cooling. This is a very small draft angle (typically use 3-5 degrees). But, LEGO parts are also small, and the material (ABS) is very uniform. Larger draft angles are required for deeper parts or when the surface finish isn’t smooth (more difficult to eject without damaging the part in those cases).
Another necessary component of enabling separation is the parting line! You must design this into your parts from the start, or it can require significant rework. The parting line is where the core and the cavity meet. It often leaves a small and noticeable flash line, so place it accordingly. In LEGO’s case it is well hidden, and occurs on the bottom edge (shown in picture B), just before any radius shows up on the part.

Ribs are essential to increasing part strength when injection molding. Here are some basic rules of thumb:
Ribs should be 40-60% of the wall thickness to which they connect.
Often, you’d want a thicker rib to add rigidity, but if it's too thick, a sink mark will appear on the wall to which it is connected.
Ribs should not be more than ~three times the thickness of the wall they attach to in height. This ensures they are fully filled during the injection. Just like any other wall, don't forget that ribs need to be drafted too!
This defect is referred to as a “short shot,” namely because the injection did not make it far enough before cooling to fill the entirety of the mold (it came up short). Depending on part size, plastic viscosity/injection temperature, and injection pressure, beware of designing features with thickness < 1mm. Also, pay attention to the proximity to gates (more on that later)
Round cylindrical protrusions jutting from a part are called “bosses”(shown in picture A) They are typically used either as a receptacle for a screw/insert, or to help locate/assemble the part. The latter is the case for a LEGO. Bosses, like ribs, should be 40-60% of the wall thickness to which they connect. When it comes to draft, both the inside and outside of the boss need to be drafted. Bosses are often supported with ribs, as is the case in this part.
Gates are the injection point of the plastic. Depending on which release date of LEGO brick we look at, the gate has moved around a bit. In the part shown in picture C, it is right in the middle of the brick and can be noted as a small nub where the plastic is broken to separate the piece. In larger bricks, LEGO is able to hide the gate more effectively, but in the infamous 1x1, there is extremely limited real estate.
Now that the core and cavity have released the part, it is likely still attached. To push it off of the mold (and into a bucket presumably), ejection pins are the go-to method. These are small cylindrical pins that push out of the mold and knock the plastic off the mold. They leave small marks as the plastic has not cooled fully yet, and can be found on pretty much any injection molded part. In LEGO’s case, it may also be a sleeve around the central stud as can be seen by the slight marking in picture A.
Defects/terms that you should know of and be able to offer a brief explanation & fix: flow lines, weld lines, sink, short shot, flash, and jetting. This is a very common interview question if injection molding part design is involved.
Ok, so now to answer the actual interview question we started off this whole newsletter with:
I like to start off by running through the basics with uniform wall thickness, fillets, and draft. Then, jump into ribs and bosses to increase strength/function. Finally, the place to impress is by getting creative with the parting lines, gates, and ejection pins. I usually like to bait the interviewer to ask about defects and have that be my go-to follow-up!
If you really want to get fancy, you can jump into the material properties of different plastics, discuss other strengthening methods like glass filling or even bring up insert molding/over-molding if applicable to the part (not as applicable in this question but often used in the industry).
It is also worth noting, that there are two important steps involved in kicking off a part with suppliers that we have thus far only alluded to:
Design for Manufacturing (DFM)
After sending out a design, a good vendor will send back a presentation detailing any requested changes in design and tolerances (from your accompanying GD&T drawing). You can then push back, or accept changes until the final design is agreed upon. In this stage, you will likely see photos of their proposed mold geometry.
Never fully trust a vendor. At the end of the day, it’s your job to make sure your part works. Depending on the vendor, they may agree to all your tolerances and then ship you parts completely out of spec. Combat this by requesting first article inspection (FAI) of a sampling of parts (then at least you’ll know they’re out of spec. in advance).
Mold Flow Analysis
The vendor will also send you a mold flow analysis for you to look over. This will contain the suggested temperature, injection and clamping pressure, gate locations, ejector pin locations, predicted mold flow, etc. It is critical to look through this and make sure nothing functional is impacted.
Also of note is the expected deformation the part is likely to exhibit, as this needs to be accounted for via structural simulation and/or tolerancing.
For more, MechE resources like a portfolio database or hardware job board, check out our website!